Building a Microscope
Recently, I happened to be lucky enough to come upon one of the finest examples of free leftover electronics that I have ever seen:
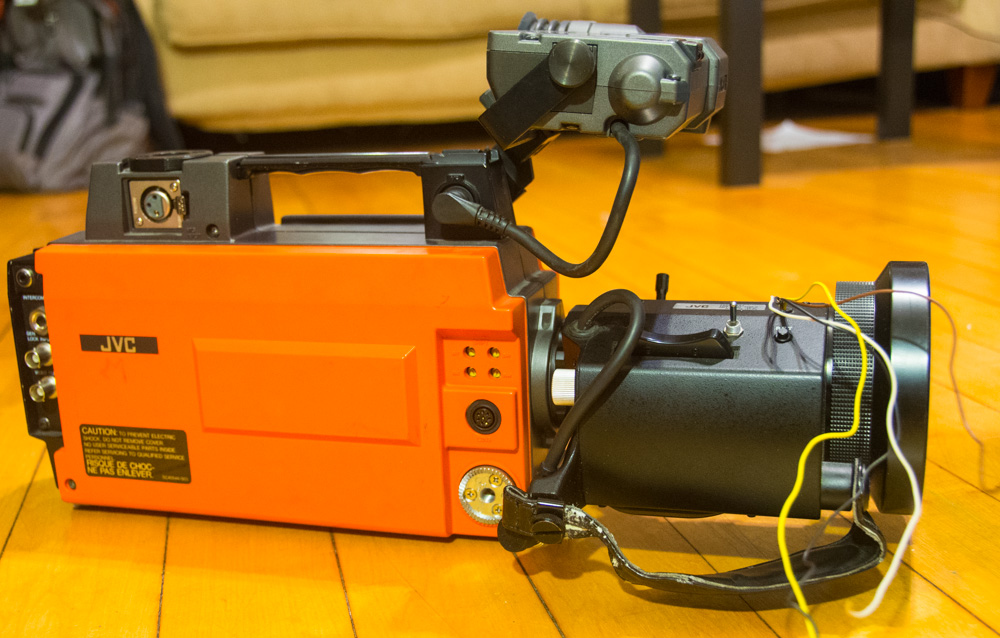
In case you weren’t around when this was new (I wasn’t either), this is a 1980s-era video camera. Although it looks like it would take a VHS tape, it actually has no storage capacity at all and just sends video data out through the connectors on the back. What it does have, however, is a fabulous detachable lens on the front:

That’s a JVC HZ-2100 U zoom lens, with 10-100mm focal length and apterture of f/1.6, with a servo assembly mounted to it. More importantly, it’s a nice, wide-angle lens that I didn’t have to pay for. I’ve been meaning to build or buy a macro lens of some kind to further my work on scratch holograms (previously, more previously), since I would really like to be able to observe the exact shape of my scratching tool and the cuts that it makes. This lens gives me exactly that opportunity.
Lens Stacking
Lens stacking is the process of combining multiple complete lenses on a single camera. Typically, a long telephoto lens is put on the camera normally, and then a wide-angle lens is placed backwards on the end of the long lens. Here’s a random article describing the technique: macro-photography.org. The point of lens stacking is that you can produce a combination of lenses with a magnification ratio equal to the ratio of the focal lengths of the lenses involved.
In my case, I have a 200mm lens mounted to the camera, and the 10mm JVC lens on the front of that, for a magnification ratio of 20. Now, how useful is 20x magnification? For this we need some math:
My camera, a Nikon D600, has a sensor which is about 36mm wide with about 6000 pixels along the long edge. With a 20X magnification, the size of the area being viewed in a single image is
\[
	\frac{1}{20} \times 36\,\text{mm} = 1.8\,\text{mm}.
\]
Dividing that up into 6000 pixels gives us a spatial resolution of
\[
\frac{1.8\,\text{mm}}{6000\,\text{pixels}} = 300\,\text{nm},
\]
which is about 20 times smaller than a human red blood cell. So we should be able to see some pretty interesting things with a 20X magnification.
The Setup

I joined the two lenses using a 72mm male-to-male coupling ring (amazon link), which screws into the filter ring on the front of both lenses. Then it was just a matter of mounting the whole system on a tripod and putting the target object below the second lens.
I mounted the entire system vertically to reduce bending stress on the lenses and couplings. For my first tests, lighting consisted of a desk lamp placed as close as possible to the subject. Here’s a closeup of the second lens and my first subject, a dime (the coins beneath it were stacked to get the correct distance for focusing):

The focus rings on the two lenses are nearly useless when mounted this way, and they both need to be set to infinity to produce a clear image. This means that the focal distance for the camera is fixed, and the only way to focus on an object is to move it to exactly the correct distance in front of the camera. Since stacking coins proved to be a tedious way to do this, I quickly put together a simple focusing stand consisting of a sheet of 1/4” aluminum with three bolts sticking down through holes in the edges. Turning the bolts raises and lowers the aluminum plate, focusing the camera on whatever is sitting on top. The plate helped, but it’s not very accurate or stable, so I’ll need to improve on that design.
The Results
Here’s what it looked like with everything set up:

And the resulting image of the “E” in the “E Pluribus Unum” on a U.S. dime:

Here’s another image, this time of the “A” in the “Designed by Apple” engraving on the back of an iPod Nano:

I realized after taking these images that I had accidentally set the focal length on the second lens to 20mm instead of 10mm, giving me a magnification of only 10X. I fixed that for a later set of photos and managed to get this picture of the mint mark on the same dime:

Here’s the tip of a needle. Note the smooth curve of what certainly feels like a very sharp point:

And a single grain of salt (I had quite a lot of trouble focusing on this one, so the image is pretty blurry):

Conclusions
This certainly isn’t a perfect microscope setup. The magnification is as advertised, but the image quality is quite low. Even without the difficulty in focusing, there is a great deal of chromatic aberration and other distortion caused by the many, many pieces of glass that the image has to travel through. The real problem is that I’m using two zoom lenses for this task, both of which are sacrificing image quality for flexibility in focal length. If I can find a 10mm lens with a fixed focal length, I may be able to get much higher quality images from this setup.
Still, this was tons of fun to play with, and I’m excited to find out what else I can see with my new toy.
Robin Deits 15 May 2013